The 4 most common options for mounting PV modules on tile roofs are tile Hooks, hanger bolt assemblies, standoffs that require drilling or cutting of tile, and flashing systems that replace a complete tile.
Jolene Ciosek | EcoFasten Solar
Reprinted with permission from From Ridge To Eave:
This summer we were fortunate enough to participate in a webinar featuring best practices for installing solar on tile, shingle, and metal roofing. While we presented for tile, IronRidge presented for asphalt shingle, and SunModo presented for metal.
Brian, our President & founder, began his career as a slate roofing contractor in the 1970’s, and his decades of experience and knowledge have made him an authoritative voice in the industry, as well as a thought leader, and the perfect person to go to, to get real answers.
Webinars are such a great way to share knowledge with the industry….as I’ve said hundreds of times before, the more we know, the better off we all are.
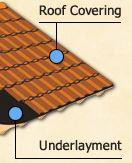
Tile roofing comes in many styles, materials, and profiles, with the most common being Flat, S, W, and mission. Each is unique, and each presents its own unique sets of challenges. Tile roofing consists of 3 common elements.
1. The tiles themselves

2. Battens. Battens are the attachment points for the tiles.

3. Underlayment or sheathing (surprisingly, this has only been a requirement since 1986 – prior to that, it was not realized that the underlayment was the actual waterproofing element, and that the tiles were just a dressed-up cover.) Underlayment was actually first developed in European nations as tile roofs were collapsing due to the build-up of heavy, wet sand that had accumulated under tiles.

In the most ideal application, your mounting and flashing solutions should be specific to your tile type.
What should you look for before installing solar on a tile roof?
Damage from pests. Tile roofs present an ideal home for bats, squirrels, rats, wasps, and all kinds of other pests that can wreak havoc to your roofing.
Damage from past work. Dropped tools, or even something as simple as standing the wrong way on tile roofing can break and crack the tiles.

IMPORTANT: Damaged tiles should always be replaced before you install an array!
Remember, even if the damage was there before you were, it will be blamed on the LAST person who was on the roof. Don’t let that person be you!
Solar mounting solutions that replace a complete tile with flashing are a great source for replacement of tile. If you replace a perfectly good piece of tile with a system like this, you’ll have extra tiles left over for accidental breakage or damage during the install. Trust us….it WILL happen on every single tile roof you install on.
While you’re doing your pre-install inspection, make sure you take a peek at the condition of the underlayment. You want to make sure it’s in good shape, and if it’s not, it’ll need to be replaced. You already know this is the primary source of waterproofing for the roof, so this step can’t be skipped.
Look for things like capillary action, which can cause moisture, saturating the underside of the tiles. Wind-driven rain can also find its way up and under tile, so be on the lookout for mold and curling of the underlayment – sure signs of a leak or the need to re-roof.
Do the underlayment and/or battens need repairing? While you’re making note of this, pay close attention to the spacing between battens – this is important for installing metal flashing at the roof deck level on retrofit roofs. Be aware that there will often not be enough room between battens to install flashing too large for those areas.
Mounting options for tile
The 4 most common options for mounting PV modules on tile roofs are tile Hooks, hanger bolt assemblies, standoffs that require drilling or cutting of tile, and flashing systems that replace a complete tile (like our Tile Flashing System).

There’s no other way to say it – tile hooks have been proven as weak attachment points. The reason is that the level arm can deflect and break the tile under loads, providing a direct path to solar attachment for moisture, pests, etc….
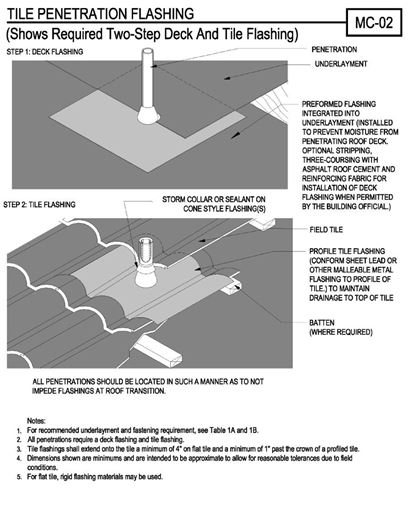
Cutting or boring tiles to flash a standoff will involve “bibbing”, or mastic & metal flashing at the roof underlayment, with metal boot flashing at the tile surface.

New, innovative products that are less labor intensive, and require less tooling, and no messy mastic are available and are the preferred choice of installers wanting to do the job in the easiest, best way possible.
Installation Considerations
The layout will be determined by a structural engineer, and approved by the AHJ (Authority Having Jurisdiction). Always install mounts into rafters, and don’t cut corners – always pre-drill holes in the center of the rafters for lag bolts….if you don’t pre-drill, you run the risk of cracking or splitting the rafter, causing leaking, which will ultimately be your fault. Do it the right way to begin with, and save yourself the headache of a lifetime.

The TRI (Tile Roofing Institute) recommends flashing/seal at the roof deck AND the tile level. Flashing should meet UL 441, Section 25 – Flashing Standards for Gas Vents (this is the closest standard available for PV attachments).Flashing should also meet ICC-ES AC 286 § 4.1.

Mission or lightweight tile
Mission (clay) tile is fragile, and is not ideal to install over due to excessive risk of breakage. The “strip & go” method is often used, where the tiles are removed from the section of the roof that the array will be installed on, and replaced with asphalt shingles.

Minimize additional weight
Tile is heavy. Like, really heavy. Minimizing additional weight on the roof, and gaining approval from a structural engineer will ensure structural integrity.
Time on the roof
Even the strongest types of tile can be brittle, and can break easily. Because of this, you should spend as little time on the roof as possible to minimize the chance of dropping tools and/or standing the wrong way.

Whether your next install on tile is your first or your hundredth, we hope these tips come in handy and serve you well – they come straight from a guy who knows the roofing and solar industries inside out. Good luck!
Our Tile Flashing System replaces a complete tile, eliminating cutting, drilling, boring, or breaking of tiles. It’s fast, easy, and like all of our products, it utilizes our patented, watertight compression technology. It’s also backed by IAPMO, so you can have confidence that it does what we say it’ll do.

Want a sample? Just let us know what profile you install on most often.

Questions? Ask away – that’s what we’re here for!
About EcoFasten Solar®
EcoFasten Solar® designs, engineers and manufactures patented, watertight solar roof mounts and components. We work closely with leading solar developers, racking system providers, roofing manufacturers and commercial installation companies to ensure we deliver the highest quality product every time. All of our products are designed with the installer in mind.
The content & opinions in this article are the author’s and do not necessarily represent the views of AltEnergyMag
Comments (0)
This post does not have any comments. Be the first to leave a comment below.
Featured Product


